R36S Guides Tutorials HowTos
Backup your stock SD card
-

BOOT partition of a R36S with the original (V1) screen -
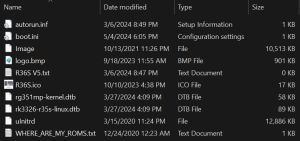
BOOT partition of a R36S with the panel 4 (V5) screen -
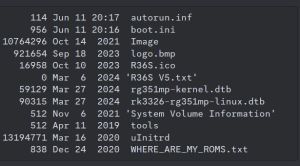
Different BOOT partition of a R36S with the panel 4 (V5) screen


This is the first step you should take before doing anything with your console. Save the contents of the microSD to your computer.
The 📄gameconsole-r36s.dtb, 📄rk3326-r35s-linux.dtb or 📄rk3326-rg351mp-linux.dtb from the 📁BOOT partition is the most important file. You're probably going to need this file to identify your R36S Panel version.
The original BOOT partition can also have different names like "R36S V52 64G".
My original SD card got corrupted before I could make a backup
You can setup a new microSD card without any backed up files from the original microSD card. It just requires some trial and error to test different R36S device type configurations/"Panel files".
Here are links to the different "panel" files:
R36S-Device Tree Blob - dtb files at GitHub for ArkOS
Panel 4 (V5) AmberELEC sound + FN button fix
I don't have these files on my SD card
If you have a 📁EELEC partition or your files are 📄rk3326-evb-lp3-v12-linux.dtb or 📄rf3536k3ka.dtb, you got the EmuELEC Clone that is not compatible with standard ArkOS/AmberELEC.
Change the stock SD card
Getting a new quality microSD card is almost unavoidable. Stock cards are the lowest quality possible.
Don't re-use the stock card for installing new custom firmware.
Don't update ArkOS on your stock card, because there's a high chance it will corrupt the filesystem.
Identify your R36S device type (Panel)
Knowing your R36S Panel type is going to be helpful during installing custom firmware. This requires the .dtb file from the first step on this page (Backup your stock SD card). Use the tool at this link:
Unofficial Handheld DTB Analysis Tool
- Works for most panel types (both genuine panel and clone panel files)
- Tells your screen panel and can show detailed data
- For clones it gives instructions on how to get arkos4clone or ArkOS K36 working
- If it shows no result, you probably uploaded the wrong file


You can also check visually which type your device is by comparing your mainboard at these links.
Look under the battery for the mainboard number. If you don't have a transparent device, you need to remove the backplate (6 screws). You can check visually which type your device is by comparing your mainboard at these links.
There are basically three types of R36S devices.
- The "genuine" ones are compatible with standard ArkOS (community or RG351MP version), AmberELEC, AndR36oid or one of the other 15 opttions.
- The "clones" which have a different board (Gaminja K36 in a R36S shell). Hardware parts are often even worse than "genuine"/"standard" R36S. There was a long time without good custom firmware for them. It got better with ArkOS K36, UnofficialOS clone R36S support and arkos4clone.
- The really bad clones/fakes like R36HD, GB350 clones, GA36 clone or PS202 clone, which have a different mainboard, weaker chip and zero custom firmware support.
Firmware Flashing Guide
Custom Firmware
There are multiple firmware options for the R36S Handheld. Please refer to the R36S Custom Firmware page and choose one.
Software needed
Firmware flashing tool like Rufus, Raspberry Pi Imager or Win32 Disk Imager
In this guide the portable version of Rufus has been used.
Step-by-Step Guide
1) Select your new SD card, the firmware image and click on start

2) Click OK to confirm. Make sure you selected the correct drive/SD card.

3) Wait till the flashing process is finished.

4) Close Rufus

5) Remove USB safely
6) First boot up
Insert the SD card into your device and press the power button. Rom folders and other stuff will now be generated. This process usually takes about 5 minutes (wait till the menu is loaded). Now the SD card is ready and you can add your game files and roms.
7) Gaming time
Have fun playing!

Video Guides - Tutorials - How-To's
Ultimate R36S ArkOS Fresh Install Guide (All R36S Variants)
Older Guides
Some of these are missing crucial steps for installing ArkOS on "Panel 4 devices", but are good guides for setting up emulators etc.
R35S/R36S Ultimate Setup Guide - ArkOS, Roms and BIOS (by Joey's Retro Handhelds)
R36S MASTER Starter Guide (by Javi Play Retro)
R36s guide for beginners in 2024 (by Jacek Rusin)
Install ArkOS using macOS
Written Guides - Tutorials - How-To's
A guide on getting started with you R36s and more (by AMSanchezC)
R35S/R36S Setup Guide (by Joey's Retro Handhelds)
R36S BASIC CONFIGURATION (by KuvZz)
R3XS Beginners Comprehensive Guide (by AeolusUX)
Flashing/Installation Guide for ArkOS v2.0 (by AeolusUX)
My R36S user manual (by Clitch77)
SPANISH Guia Definitiva De La Consola R36S (by ElVickz)
FRENCH R36S guide/wiki (by Daebis)
R36S Türkiye Topluluğu (by VicettiSun)
Install ArkOS without a PC using Android Devices
Other Projects at the Handhelds Wiki